


 Media Coverage
 Press Release
Implement Effective Workflow Governance in Alteryx Designer
Enhance Control and Efficiency with CMT in Alteryx Designer
Enterprises’ growing focus on data of late has propelled Alteryx to becoming one of the preferred choices for things like data blending, advanced analytics, and workflow automation. As organizations leverage Alteryx’s power for their data processing needs, ensuring proper workflow governance becomes increasingly crucial. This is where Customer Managed Telemetry (CMT) comes in, providing valuable insights into how workflows are developed and utilized within the organization.
CMT offers a window into user activity within Alteryx Designer. When enabled, it automatically generates log files for each workflow execution, capturing essential details like user ID, timestamp, and the entire workflow structure in XML format (not actual data). While the XML files can be opened manually, Alteryx’s true strength lies in its ability to automate processes. By leveraging Alteryx’s native tools, we can effortlessly parse these files, unlocking valuable insights for risk management, training needs identification, and data connection analysis.
In this blog we will talk about the practical application of CMT, guiding you through the setup process and demonstrating how to create a comprehensive Tableau dashboard based on your generated log files. This in turn will help you effectively govern your organization’s Alteryx workflows, optimizing data utilization and ensuring smooth operations.
Introduction to Workflow Governance
Understanding CMT (Continuous Metadata Injection)

Implementing CMT for Workflow Governance
Benefits of CMT in Alteryx Designer
Part 1: Telemetry Setup
Step 1:
Open the RuntimeSettings file, typically located in the following directories. Please note that the below file paths are the default paths for Alteryx installations. Your version of Alteryx might be installed in a different location.
- Admin Version: %ProgramFiles%\Alteryx\bin\RuntimeData
- Non-Admin Version: %LocalAppData%\Alteryx\bin\RuntimeData
Step 2:
Ensure you have edit permission to the RuntimeSettings file.
Step 3:
Add the below code to the RuntimeSettings XML file. Ensure that the Telemetry tag is nested under SystemSettings, but not under any other tag within SystemSettings.
You can set the file path to any existing path you want the XML to be stored in. The example file below saves the files to a log folder within H:\Customer managed telemetry\Logs. Also, note that the EnableCustomerManagedTelemetry tag and associated file path should be on one line. Don’t place the tag in another section.
<Telemetry>
<EnableCustomerManagedTelemetry>H:\Customer managed telemetry\Logs</EnableCustomerManagedTelemetry>
</Telemetry>
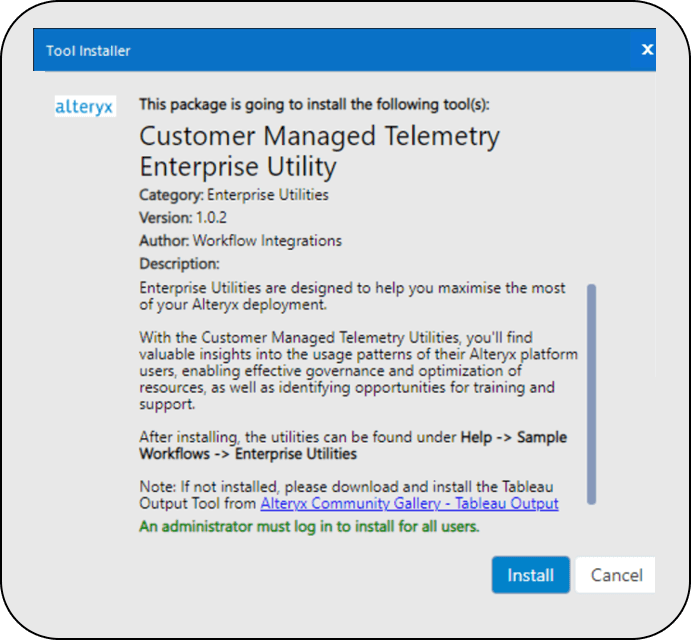
Part 2: Installing Customer Managed Telemetry Enterprise Utility and Running the Workflow.
What is Workflow Governance?
Why Use CMT for Workflow Governance?
Steps to Implement CMT in Alteryx Designer
Conclusion: Enhancing Workflow Governance with CMT
Step 1:
The Alteryx Enterprise Utility is available for free on the Alteryx Marketplace. Once downloaded to your machine, double-click on the download, and the starter kit will install all necessary packages.
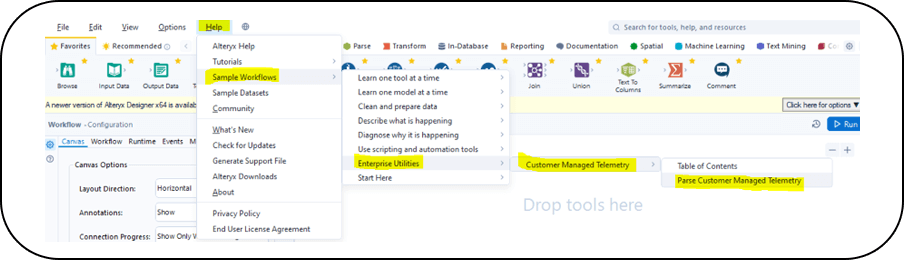
Step 2:
Go to the Help menu -> Sample Workflows -> Enterprise Utilities -> Customer Managed Telemetry. Then Click on Parse Customer Managed Telemetry to open the workflow.
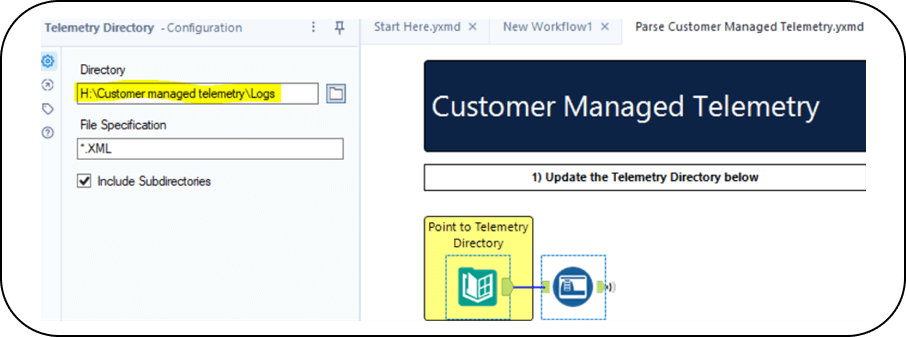
Step 3:
Before running the workflow, you need to configure it.
First, point it to the directory where you collect all the telemetry log files.
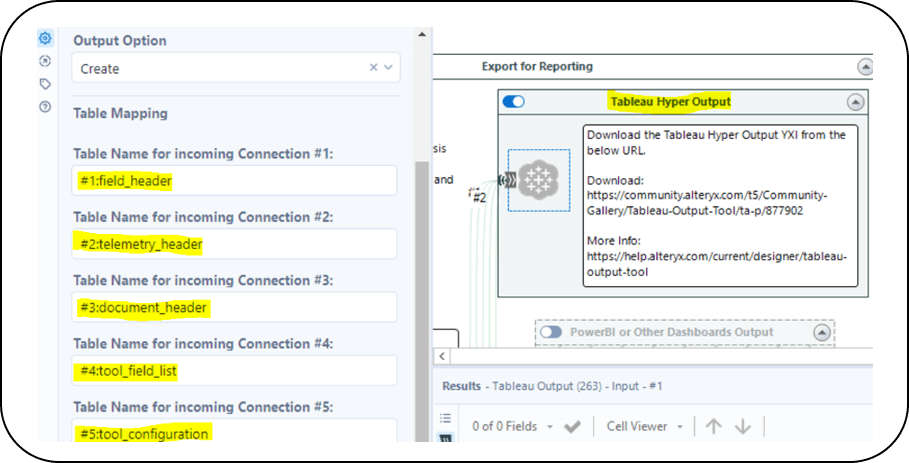
Make sure that the Tables have the correct names.
Once set up, hit “Run” to execute the workflow.
Step 4:
Visualization and Reporting
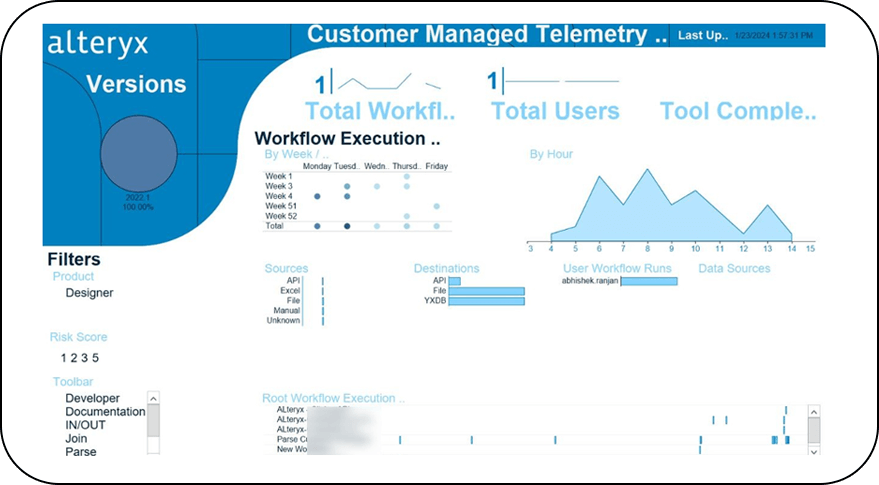
By default, the Enterprise Utility produces two sets of dashboards i.e. one for Tableau and one for Power BI. Both are stored in the same folder as the workflow. You can access both pre-configured dashboards with your output hyper files/CSV files (for Tableau/Power BI). Here’s a screenshot of the sample Tableau Dashboard:
By implementing Customer Managed Telemetry, you can reap significant benefits in the area of risk reduction. CMT bridges the gap between controlled production environments and potentially unmonitored Alteryx usage on individual desktops. This newfound visibility equips you to identify routine workflows that are executed outside of production, as well as instances where potentially high-risk tools are being utilized. Additionally, CMT empowers you to establish a more robust understanding of data lineage by linking workflows and data access points, leading to a more comprehensive and secure data ecosystem.

